File-based Routing in Fastify
Eliminate the need for a route file by using file-based routing in Fastify.
Planted March 28, 2024
I don’t know about you but I’m a big fan of file based routing. I enjoyed it in PHP and finding it in Next.js sped up my React development a lot. It has never been something I used in Express so when I moved to Fastify, I didn’t even think it was an option. But it is and in this article, I want to show you how to set it up.
What is file based routing?
Rather than creating a route file that we register with our application, we’ll create a file in a certain directory structure. The name and location of the file will dictate the route. For example, a file named routes.js in the routes/user directory will create a route of /user. This is a simple example but we can also create nested routes by creating a file in a subdirectory. For example, a file named routes.js in the routes/user/profile directory will create a route of /user/profile.
Setting up the project
For this example, I’m going to create a new Fastify project using the Fastify CLI. We’ll use npx which is included with Node.js to run the Fastify CLI.
npx fastify-cli generate file-based-routing --esmThis will create a new Fastify project in a directory named file-based-routing. The --esm flag tells the Fastify CLI to use ECMAScript modules. Like Node.js, Fastify supports both CommonJS and ECMAScript modules. I prefer ECMAScript modules so I’m using that here. The single line in the package.json file that tells Node.js to use ECMAScript modules is "type": "module".
Configuring the project
The good news is that the Fastify CLI has already set up file-based routing in the project for us. The app.js file is where we can see the configuration for our Fastify application. The routes directory is where we’ll create our file based routes. The plugins directory is where we’ll create our Fastify plugins.
If you are trying adding file based routing to an existing Fastify project, you’ll need to make sure that the @fastify/autoload plugin is installed. This plugin will automatically load the routes from the routes directory. If it’s not installed, you can install it using npm or yarn.
npm install @fastify/autoloador
yarn add @fastify/autoloadIn the app.js file, we need to register the @fastify/autoload plugin. We can do this by importing the plugin and then calling the register method on our Fastify instance.
import path from 'path'import AutoLoad from '@fastify/autoload'import { fileURLToPath } from 'url'
const __filename = fileURLToPath(import.meta.url)const __dirname = path.dirname(__filename)
export default async function (fastify, opts) {  fastify.register(AutoLoad, {    dir: path.join(__dirname, 'plugins'),    options: Object.assign({}, opts)  })  fastify.register(AutoLoad, {    dir: path.join(__dirname, 'routes'),    options: Object.assign({prefix: "/api/v1/"}, opts)  })}
This assumes you’re using ECMAScript modules. If you’re using CommonJS modules, you’ll need to use require instead of import. This is also assuming you’re starting your server with the fastify-cli. If you’re not, you’ll need to instantiate your Fastify instance and register the plugin like this.
import fastify from "fastify";import autoLoad from "@fastify/autoload";import path from "node:path";import { fileURLToPath } from "node:url";
const __filename = fileURLToPath(import.meta.url)const __dirname = path.dirname(__filename)
const app = fastify({ logger: true });
app.register(autoLoad, {  dir: join(__dirname, "routes"),  dirNameRoutePrefix: true,  options: {prefix: "/api/v1/"},});
app.listen({ port: process.env.PORT, host: "0.0.0.0" }, (err, address) => {  if (err) {    console.error(err);    process.exit(1);  }  console.log(`Server listening at ${address}`);});
Creating the routes
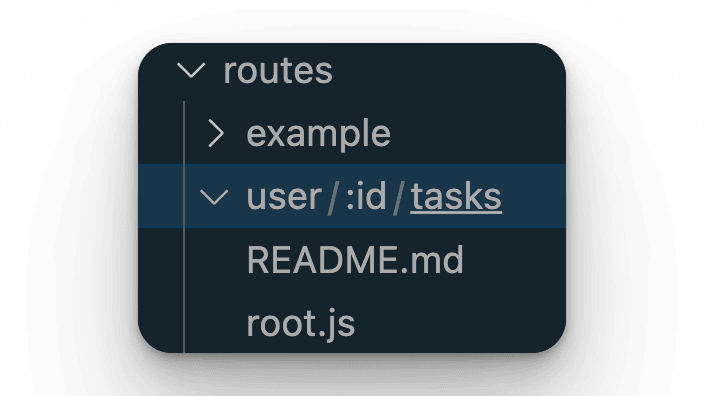
The Fastify CLI creates a routes directory in the project. This is where we’ll create our file based routes. Unlike other frameworks, the filename doesn’t matter. We can name the file whatever we want. The directory structure is what matters.
The Fastify CLI creates a root.js file in the routes directory. This is a simple route that returns a JSON response. We can test that this route is working by running the Fastify server and checking.
npm run devNow, point your browser at the URL in your terminal and you should get back a JSON response:
{ "root": true}There is also a folder called example with a file index.js in it. This is a nested route. The Fastify CLI has created this to show you how to create nested routes. If you navigate to /example in your browser, you should see the following text response:
this is an exampleAdding a new route (with a dynamic component)
Let’s add a new route set to the project. We want to create CRUD routes for a users tasks.
First, we’ll create some nested folders - user/:id/tasks.
and add a file named routes.js in the tasks folder. This will create a route of /user/:id/tasks.
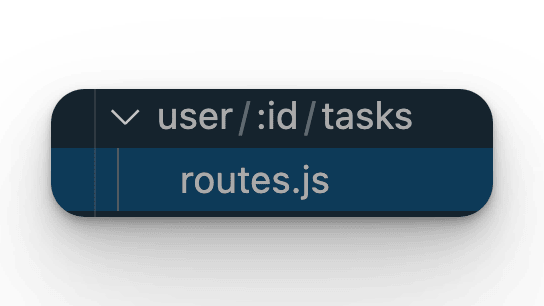
The filename doesn’t matter remember, just the directory. I call the file routes.js if I want it to handle multiple HTTP methods and URIs. If I want it to handle a single HTTP method or URI, I’ll name the file index.js or something meaningful.
In the routes.js folder we’ll add the following code:
export default async function (fastify, opts) { fastify.post("/", async function (request, reply) {}); fastify.get("/", async function (request, reply) {}); fastify.get("/:resourceId", async function (request, reply) {}); fastify.patch("/:resourceId", async function (request, reply) {}); fastify.delete("/:resourceId", async function (request, reply) {});}This is the order I like to write my routes in - it follows the CRUD pattern. You can write your routes in any order you like.
Accessing the dynamic component
In the routes.js file, we have a route of /user/:id/tasks/:resourceId. We can access the id and resourceId parameters using the request.params object.
fastify.get("/:resourceId", async function (request, reply) { const { id, resourceId } = request.params; reply.send({ id, resourceId });});This will return a JSON response with the id and resourceId parameters. Note that the id parameter is available because the directory name (:id). The resourceId parameter is available because it’s in the route URI. Both are available in the request.params object.
Conclusion
File based routing is a great way to organize your routes. It’s especially useful when you have a lot of routes. It’s also a great way to keep your routes close to the code that they’re handling. This can make it easier to maintain your code and understand what’s happening. I hope this article has shown you how to set up file based routing in Fastify. If you have any questions, feel free to reach out to me. I’m always happy to help.